
Tuesday, November 8, 2011
Pictures of My Furniture Hanging on the Wall - #7

Pictures of My Furniture Hanging on the Wall - #5
My Parent’s Magazine Rack Table holding a Charleston, South Carolina “Sweegrass Basket” filled with sea shells, and a Brass ray with Wine Goblets and Candle


Pictures of My Furniture Hanging on the Wall - #4
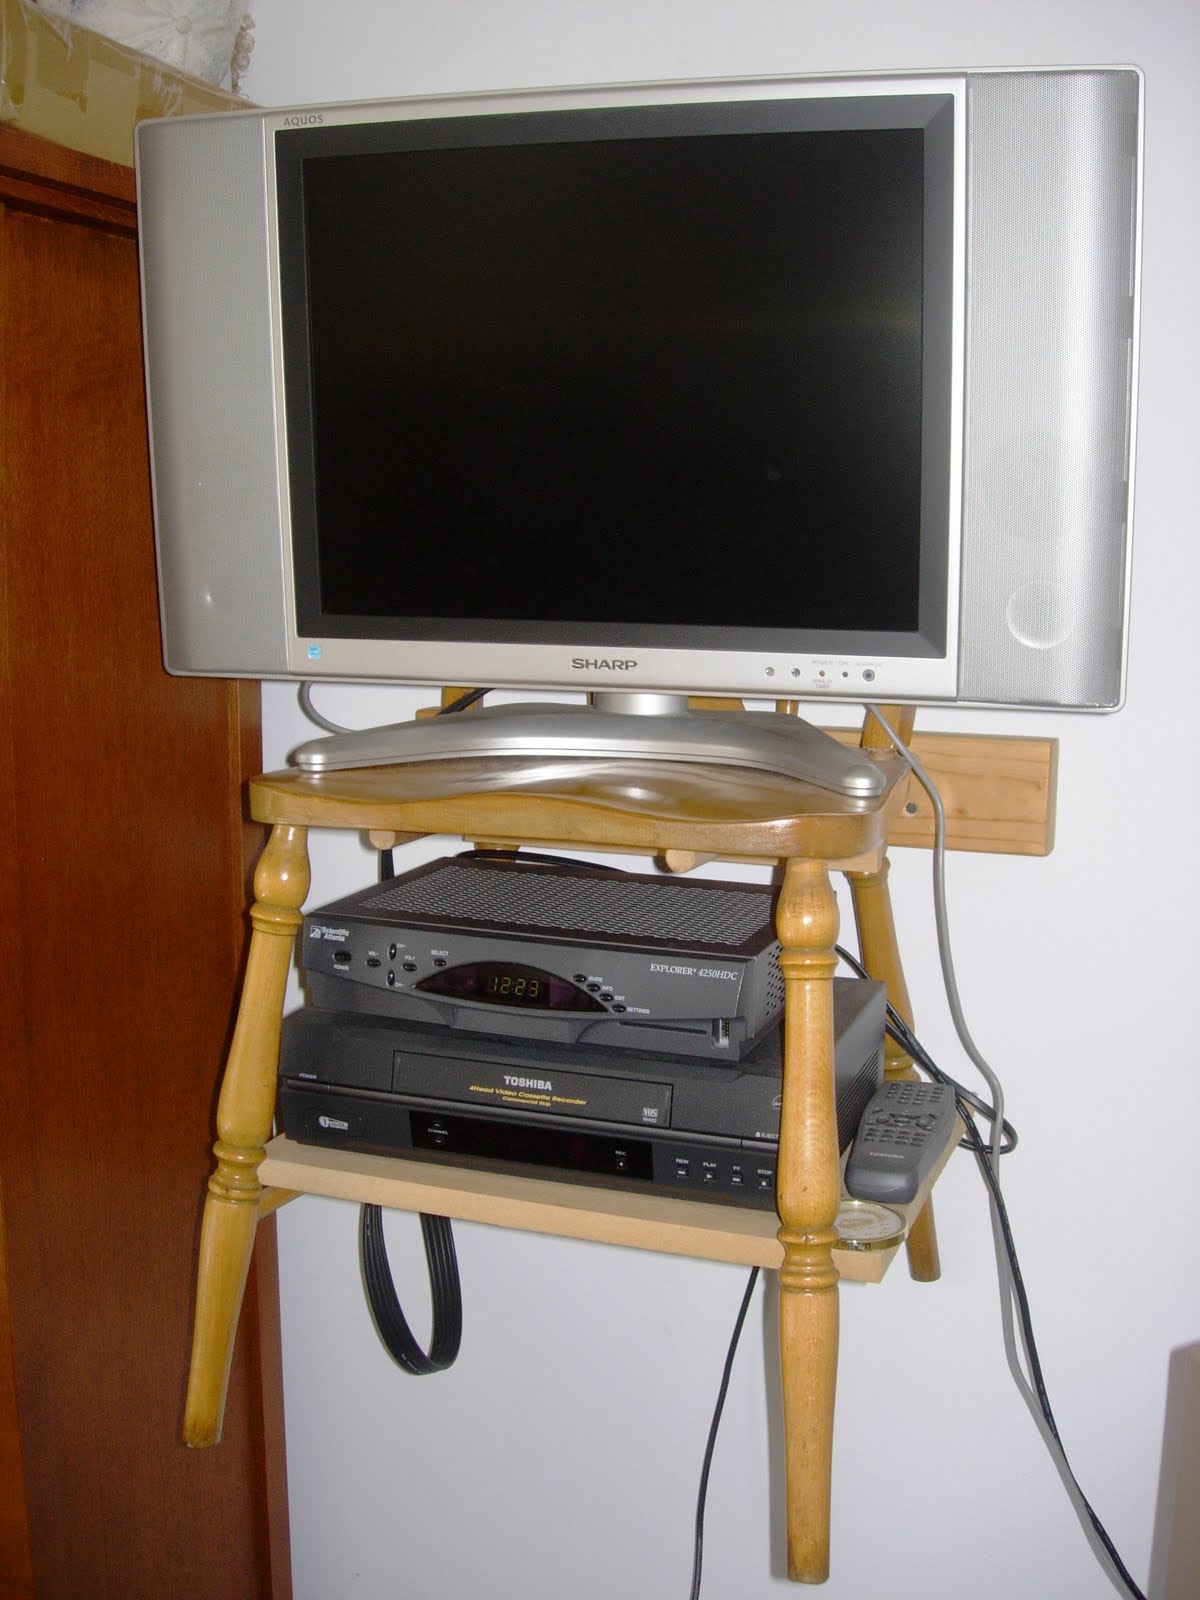
My Parent’s First Kitchen Table Chair that holds the TV in the Living Room

Pictures of My Furniture Hanging on the Wall - #3
Parent’s Telephone Table and Chair storing the most of the Games


Pictures of My Furniture Hanging on the Wall - #2
My Childhood Vanity Table displaying more Longaberger Baskets!


Pictures of My Furniture Hanging on the Wall - #1
Nesting Tables, bought from an Estate Sale, displaying Longaberger Baskets
 Attention all Interior Designers, House Stagers, DIY enthusiasts, De-Clutter achievers:
Are you a Fan of Antique, Classic, Country, Mid-20th Century, Eclectic styles, like I am?
Hello, I’m quite a “collector” of Family Heirlooms/History, Antiques, Estate Sale, Auctions, Friends.
So it stands to reason that at some point, I would run out of floor space room for all the furniture I’ve acquired. So with my creative mind, I chose to invent a one of a kind, unusual, unique storage solution for my pieces, by hanging the furniture on the wall!
This allows me to easily, multi-purpose, re invent, re purpose, re use, re cycle favorite pieces of furniture to minimize clutter. Hanging furniture on the wall has put some organization back in the house, by using those pieces for storage, and also to display of some of my collections.
And more importantly, no piece of furniture’s integrity is compromised by the techniques used to hang them on the wall.
Oh, don’t get me wrong, there is still enough furniture to cover most (all), the floor space in our home!
But this has been a fun, conversational decorating style that has caught the attention of all guests to our home. If you have any questions, please contact me through this Blog.
Attention all Interior Designers, House Stagers, DIY enthusiasts, De-Clutter achievers:
Are you a Fan of Antique, Classic, Country, Mid-20th Century, Eclectic styles, like I am?
Hello, I’m quite a “collector” of Family Heirlooms/History, Antiques, Estate Sale, Auctions, Friends.
So it stands to reason that at some point, I would run out of floor space room for all the furniture I’ve acquired. So with my creative mind, I chose to invent a one of a kind, unusual, unique storage solution for my pieces, by hanging the furniture on the wall!
This allows me to easily, multi-purpose, re invent, re purpose, re use, re cycle favorite pieces of furniture to minimize clutter. Hanging furniture on the wall has put some organization back in the house, by using those pieces for storage, and also to display of some of my collections.
And more importantly, no piece of furniture’s integrity is compromised by the techniques used to hang them on the wall.
Oh, don’t get me wrong, there is still enough furniture to cover most (all), the floor space in our home!
But this has been a fun, conversational decorating style that has caught the attention of all guests to our home. If you have any questions, please contact me through this Blog.

Wednesday, November 2, 2011
Post 22 of 22 Instructions to complete the 3.5 inch square Folded Fabric Fun Kit in the Diamond in a Square Quilt Square Pattern
Post 22 of 22 Instructions to complete the 3.5 inch square Folded Fabric Fun Kit in the Diamond in a Square Quilt Square Pattern
“Folded Fabric Fun Quilt Square Christmas Ornament” Kit:
Cut a piece of Crochene DMC Cotton or a Ribbon and hang on point or square using an upholstery needle. (DSCN7218)


Post 21 of 22 Instructions to complete the 3.5 inch square Folded Fabric Fun Kit in the Diamond in a Square Quilt Square Pattern
Post 21 of 22 Instructions to complete the 3.5 inch square Folded Fabric Fun Kit in the Diamond in a Square Quilt Square Pattern
“Folded Fabric Fun Quilt Square Christmas Ornament” Kit:
And you are done! (DSCN7217)


Post 20 of 22 Instructions to complete the 3.5 inch square Folded Fabric Fun Kit in the Diamond in a Square Quilt Square Pattern
Post 20 of 22 Instructions to complete the 3.5 inch square Folded Fabric Fun Kit in the Diamond in a Square Quilt Square Pattern
“Folded Fabric Fun Quilt Square Christmas Ornament” Kit:
This just shows the stitching (DSCN7209)


Post 19 of 22 Instructions to complete the 3.5 inch square Folded Fabric Fun Kit in the Diamond in a Square Quilt Square Pattern
Post 19 of 22 Instructions to complete the 3.5 inch square Folded Fabric Fun Kit in the Diamond in a Square Quilt Square Pattern
“Folded Fabric Fun Quilt Square Christmas Ornament” Kit:
Stitch around the ornament (DSCN7199)


Post 18 of 22 Instructions to complete the 3.5 inch square Folded Fabric Fun Kit in the Diamond in a Square Quilt Square Pattern
Post 18 of 22 Instructions to complete the 3.5 inch square Folded Fabric Fun Kit in the Diamond in a Square Quilt Square Pattern
“Folded Fabric Fun Quilt Square Christmas Ornament” Kit:
You can also make square corners to finish, just double fold the two opposite sides, pin in place, then double fold in the other two sides, pin and place. (not shown)
Finish as you like:
Hand stitching with a blind stitch or a blanket stitch or a stitch you like/prefer.
or
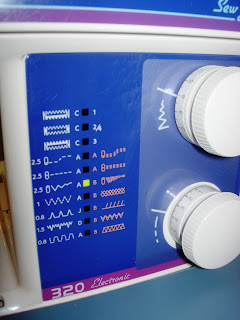
To finish by sewing machine I use the closest stitch I have, available on my Husqvarna/Viking 320 Sewing Machine, to a ‘blanket stitch.’
That stitch, it happens to be a stretch stitch, but I don’t use a stretch needle. I just use the same one I do the Zig Zag Stitch with. (DSCN7191)


Post 17 of 22 Instructions to complete the 3.5 inch square Folded Fabric Fun Kit in the Diamond in a Square Quilt Square Pattern
Post 17 of 22 Instructions to complete the 3.5 inch square Folded Fabric Fun Kit in the Diamond in a Square Quilt Square Pattern
“Folded Fabric Fun Quilt Square Christmas Ornament” Kit:
Repeat for the opposite side
(see the next 3 pictures) (DSCN7186, 7188, 7190)


Post 16 of 22 Instructions to complete the 3.5 inch square Folded Fabric Fun Kit in the Diamond in a Square Quilt Square Pattern
Post 16 of 22 Instructions to complete the 3.5 inch square Folded Fabric Fun Kit in the Diamond in a Square Quilt Square Pattern
“Folded Fabric Fun Quilt Square Christmas Ornament” Kit:
Then one more time, right up on the ornament, pin in place (DSCN7183)


Post 15 of 22 Instructions to complete the 3.5 inch square Folded Fabric Fun Kit in the Diamond in a Square Quilt Square Pattern
Post 15 of 22 Instructions to complete the 3.5 inch square Folded Fabric Fun Kit in the Diamond in a Square Quilt Square Pattern
“Folded Fabric Fun Quilt Square Christmas Ornament” Kit:
Then fold in, pin in place (DSCN7182)


Post 14 of 22 Instructions to complete the 3.5 inch square Folded Fabric Fun Kit in the Diamond in a Square Quilt Square Pattern
Post 14 of 22 Instructions to complete the 3.5 inch square Folded Fabric Fun Kit in the Diamond in a Square Quilt Square Pattern
“Folded Fabric Fun Quilt Square Christmas Ornament” Kit:
Now, to do the other two sides, fold in the corners for your miters, pin in place (DSCN7181)


Post 13 of 22 Instructions to complete the 3.5 inch square Folded Fabric Fun Kit in the Diamond in a Square Quilt Square Pattern
Post 13 of 22 Instructions to complete the 3.5 inch square Folded Fabric Fun Kit in the Diamond in a Square Quilt Square Pattern
“Folded Fabric Fun Quilt Square Christmas Ornament” Kit:
and then fold it right up on the ornament, pin in place (DSCN7180)


Post 12 of 22 Instructions to complete the 3.5 inch square Folded Fabric Fun Kit in the Diamond in a Square Quilt Square Pattern
Post 12 of 22 Instructions to complete the 3.5 inch square Folded Fabric Fun Kit in the Diamond in a Square Quilt Square Pattern
“Folded Fabric Fun Quilt Square Christmas Ornament” Kit:
Repeat for the opposite side, pin in place (DSCN7177)


Post 11 of 22 Instructions to complete the 3.5 inch square Folded Fabric Fun Kit in the Diamond in a Square Quilt Square Pattern
Post 11 of 22 Instructions to complete the 3.5 inch square Folded Fabric Fun Kit in the Diamond in a Square Quilt Square Pattern
“Folded Fabric Fun Quilt Square Christmas Ornament” Kit:
Fold in once, pin in place (DSCN7179)


Post 10 of 22 Instructions to complete the 3.5 inch square Folded Fabric Fun Kit in the Diamond in a Square Quilt Square Pattern
Post 10 of 22 Instructions to complete the 3.5 inch square Folded Fabric Fun Kit in the Diamond in a Square Quilt Square Pattern
“Folded Fabric Fun Quilt Square Christmas Ornament” Kit:
Place the ornament in the center of the WRONG side of the backing fabric square (DSCN7173)


Post 9 of 22 Instructions to complete the 3.5 inch square Folded Fabric Fun Kit in the Diamond in a Square Quilt Square Pattern
Post 9 of 22 Instructions to complete the 3.5 inch square Folded Fabric Fun Kit in the Diamond in a Square Quilt Square Pattern
“Folded Fabric Fun Quilt Square Christmas Ornament” Kit:
Zig Zag stitch all the way around the ornament
I use a # 12 needle, as you have to remember you are going through quite a few layers.
You can press this one more time, if you would like to (DSCN7167)


Post 8 of 22 Instructions to complete the 3.5 inch square Folded Fabric Fun Kit in the Diamond in a Square Quilt Square Pattern
Post 8 of 22 Instructions to complete the 3.5 inch square Folded Fabric Fun Kit in the Diamond in a Square Quilt Square Pattern
“Folded Fabric Fun Quilt Square Christmas Ornament” Kit:
With a fairly large, on my Husqvarna/Viking 320, Zig Zag Stitch use #4 for both the width and the length on the Zig Zag Stitch (DSCN7159)

Post 7 of 22 Instructions to complete the 3.5 inch square Folded Fabric Fun Kit in the Diamond in a Square Quilt Square Pattern
Post 7 of 22 Instructions to complete the 3.5 inch square Folded Fabric Fun Kit in the Diamond in a Square Quilt Square Pattern
“Folded Fabric Fun Quilt Square Christmas Ornament” Kit:
Put a small acrylic ruler (or piece of cardboard) under the ornament and take to your pressing area, and just set the iron on there to ‘set the pieces’ on last time before stitching the edges.
Using the small acrylic ruler or cardboard, put under the pressed ornament and take back to your sewing machine. (DSCN7156)


Post 6 of 22 Instructions to complete the 3.5 inch square Folded Fabric Fun Kit in the Diamond in a Square Quilt Square Pattern
Post 6 of 22 Instructions to complete the 3.5 inch square Folded Fabric Fun Kit in the Diamond in a Square Quilt Square Pattern
“Folded Fabric Fun Quilt Square Christmas Ornament” Kit:
Adjust any of the 16 pieces of folded material that may have shifted in movement (using a stylus, toothpick, your finger…. What ever will work for you.) (DSCN7153)


Post 5 of 22 Instructions to complete the 3.5 inch square Folded Fabric Fun Kit in the Diamond in a Square Quilt Square Pattern
Post 5 of 22 Instructions to complete the 3.5 inch square Folded Fabric Fun Kit in the Diamond in a Square Quilt Square Pattern
“Folded Fabric Fun Quilt Square Christmas Ornament” Kit:
Put the Backing piece close to you sewing machine for later (DSCN7155)


Post 4 of 22 Instructions to complete the 3.5 inch square Folded Fabric Fun Kit in the Diamond in a Square Quilt Square Pattern
Post 4 of 22 Instructions to complete the 3.5 inch square Folded Fabric Fun Kit in the Diamond in a Square Quilt Square Pattern
“Folded Fabric Fun Quilt Square Christmas Ornament” Kit:
Open up the backing a press flat with an iron (DSCN7151)


Post 3 of 22 Instructions to complete the 3.5 inch square Folded Fabric Fun Kit in the Diamond in a Square Quilt Square Pattern
Post 3 of 22 Instructions to complete the 3.5 inch square Folded Fabric Fun Kit in the Diamond in a Square Quilt Square Pattern
“Folded Fabric Fun Quilt Square Christmas Ornament” Kit:
Put the package and Business card to the side (DSCN7150)


Post 2 of 22 Instructions to complete the 3.5 inch square Folded Fabric Fun Kit in the Diamond in a Square Quilt Square Pattern
Post 2 of 22 Instructions to complete the 3.5 inch square Folded Fabric Fun Kit in the Diamond in a Square Quilt Square Pattern
“Folded Fabric Fun Quilt Square Christmas Ornament” Kit:
Put your hand under the Ornament/Business Card and Backing Material and gently slide out of the package (DSCN7149)


Part 1 of 22 Instructions to complete the 3.5 inch square Folded Fabric Fun Kit in the Diamond in a Square Quilt Square Pattern
Post 1 of 22 Instructions to complete the 3.5 inch square Folded Fabric Fun Kit in the Diamond in a Square Quilt Square Pattern
“Folded Fabric Fun Quilt Square Christmas Ornament” Kit:
 Place the package Right side up on a flat surface
Cut open the top of the package (DSCN7148)
Place the package Right side up on a flat surface
Cut open the top of the package (DSCN7148)

Subscribe to:
Posts (Atom)